Vagrant教程,新手指南
Vagrant 是一个构建管理虚拟机的工具,通过vagrant可以自动创建、拉起一个或多个虚拟机,降低了虚拟配置的时间和难度。
每次你去创建一台虚拟机,都要做一些重复的工作。比如你要为虚拟机安装操作系统,还要做很多配置。
Vagrant 可以让你在一个文件里写好关于虚拟机的所有的配置,比如使用的操作系统,网络的类型,IP 地址,共享的目录等等。然后用一条命令启动以后,你就拥有了一台或多台可以使用的虚拟机了。当不再需要时,你也很容易把它们销毁掉。当你需要将要你创建好的虚拟机分享给别人时,也只需要分享一份配置文件即可。
由于Vagrant所有的配置仅依靠一份Vagrantfile文件在可配置、可复制和可移植等方面相比传统的虚拟机操作提了效率和灵活性。
Vagrant 架构
Vagrant 包括以下部分
- Vagrantfile - 配置文件
- Vagrant - 命令行工具
- Vagrant Boxs - 系统镜像
- 虚拟机软件 - 如:VirtualBox
Vagrant运行示例
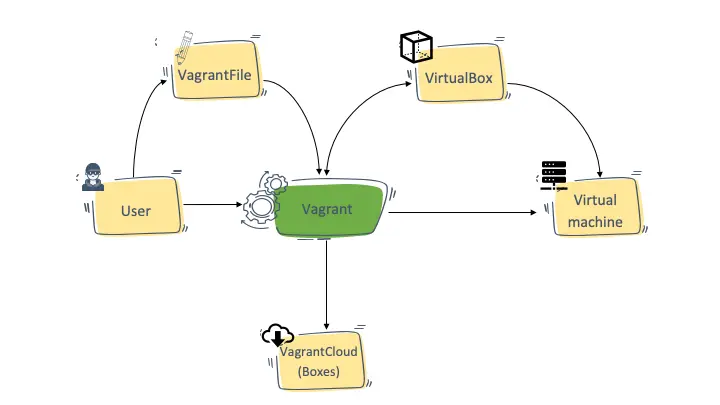
- 用户通过配置文件(Vagrantfile)管理配置虚拟机。
- Vagrant 通过Vagrantfile文件和虚拟机软件(VirtualBox)创建虚拟机。
Vagrant 安装使用
为了能够使用Vagrant你需要两样东西,一个是Vagrant本身,另一个是虚拟机软件,例如:VirtualBox, VMWare 或者 Hyper-V。这里选择VirtualBox因为它是开源免费的,也是比较常用的虚拟机软件。
安装
- 安装 Vagrant https://www.vagrantup.com/docs/installation/
- 安装 Virtualbox https://www.virtualbox.org/
安装完成后,通过vagrant -v 可以查看到相应的版本,说明vagrant安装好了,如果提示vagrant命令不存在,可能是安装时没有勾选添加命令到PATH可以手动添加。通过vagrant -h 可以查看各种命令帮助。
>vagrant -h
Usage: vagrant [options] <command> [<args>]

    -h, --help                       Print this help.

Common commands:
     autocomplete    manages autocomplete installation on host
     box             manages boxes: installation, removal, etc.
     cloud           manages everything related to Vagrant Cloud
     destroy         stops and deletes all traces of the vagrant machine
     global-status   outputs status Vagrant environments for this user
     halt            stops the vagrant machine
     help            shows the help for a subcommand
     init            initializes a new Vagrant environment by creating a Vagrantfile
     login
     package         packages a running vagrant environment into a box
     plugin          manages plugins: install, uninstall, update, etc.
     port            displays information about guest port mappings
     powershell      connects to machine via powershell remoting
     provision       provisions the vagrant machine
     push            deploys code in this environment to a configured destination
     rdp             connects to machine via RDP
     reload          restarts vagrant machine, loads new Vagrantfile configuration
     resume          resume a suspended vagrant machine
     snapshot        manages snapshots: saving, restoring, etc.
     ssh             connects to machine via SSH
     ssh-config      outputs OpenSSH valid configuration to connect to the machine
     status          outputs status of the vagrant machine
     suspend         suspends the machine
     up              starts and provisions the vagrant environment
     upload          upload to machine via communicator
     validate        validates the Vagrantfile
     vbguest         plugin: vagrant-vbguest: install VirtualBox Guest Additions to the machine
     version         prints current and latest Vagrant version
     winrm           executes commands on a machine via WinRM
     winrm-config    outputs WinRM configuration to connect to the machine
Vagrant管理虚拟机
创建项目
mkdir vagrant-hello
cd vagrant-hello
vagrant init ubuntu/xenial64
vagrant init 命令,初始化项目,并且自动生成Vagrantfile配置文件,ubuntu/xenial64 是虚拟机要用的一个系统镜像(box)的名字。
启动虚拟机
进入到项目所在目录(根目录下有 Vagrantfile 的地方),执行命令启动项目下的虚拟机:
vagrant up
首次启动虚拟机需要一定时间的等待,主要是因为在你的电脑上还没有你想在项目虚拟机上使用的系统镜像(box),Vagrant 得先在它的云服务器上为你下载需要的系统镜像。
$ vagrant up
Bringing machine 'default' up with 'virtualbox' provider...
==> default: Importing base box 'ubuntu/xenial64'...
==> default: Matching MAC address for NAT networking...
==> default: Checking if box 'ubuntu/xenial64' version '20210804.0.0' is up to date...
==> default: A newer version of the box 'ubuntu/xenial64' for provider 'virtualbox' is
==> default: available! You currently have version '20210804.0.0'. The latest is version
==> default: '20211001.0.0'. Run `vagrant box update` to update.
==> default: Setting the name of the VM: vagrant-hello_default_1647238416128_26370
==> default: Clearing any previously set network interfaces...
==> default: Preparing network interfaces based on configuration...
    default: Adapter 1: nat
==> default: Forwarding ports...
    default: 22 (guest) => 2222 (host) (adapter 1)
==> default: Running 'pre-boot' VM customizations...
==> default: Booting VM...
==> default: Waiting for machine to boot. This may take a few minutes...
    default: SSH address: 127.0.0.1:2222
    default: SSH username: vagrant
    default: SSH auth method: private key
The guest machine entered an invalid state while waiting for it
to boot. Valid states are 'starting, running'. The machine is in the
'unknown' state. Please verify everything is configured
properly and try again.
启动成功后,可以通过vagrant status 查看到虚拟机运行状态。
$ vagrant status
Current machine states:

default                   running (virtualbox)
此时如果打开 VirtualBox 软件可以看到刚刚创建的虚拟机。
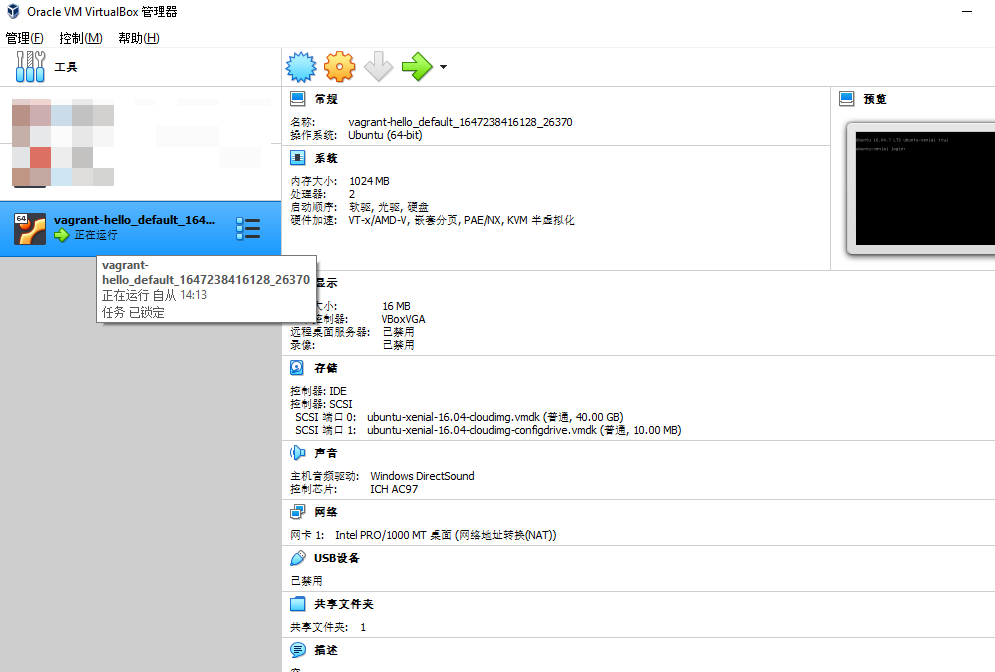 如果不使用Vagrant而直接使用VirtualBox软件,需要用户创建虚拟机,下载系统镜像,安装系统等一系列操作,但使用Vagrant只需要几条命令就可以了,十分方便。事实上如果使用vagrant管理虚拟完全不需要再通过VirtualBox界面去操作管理虚拟机,
如果需要SSH 到虚拟机可以通过vagrant ssh 命令,Vagrant创建的虚拟机默认账号为(vagrant/vagrant)
$ vagrant ssh
Welcome to Ubuntu 16.04.7 LTS (GNU/Linux 4.4.0-210-generic x86_64)

 * Documentation:  https://help.ubuntu.com
 * Management:     https://landscape.canonical.com
 * Support:        https://ubuntu.com/advantage

UA Infra: Extended Security Maintenance (ESM) is not enabled.

0 updates can be applied immediately.

26 additional security updates can be applied with UA Infra: ESM
Learn more about enabling UA Infra: ESM service for Ubuntu 16.04 at
https://ubuntu.com/16-04


The programs included with the Ubuntu system are free software;
the exact distribution terms for each program are described in the
individual files in /usr/share/doc/*/copyright.

Ubuntu comes with ABSOLUTELY NO WARRANTY, to the extent permitted by
applicable law.

vagrant@ubuntu-xenial:~$
如需退出,运行exit命令即可。如需关机运行vagrant halt,如需删除或销毁则运行vagrant destroy ,更多命令参考帮助命令vagrant -h。
Vagrantfile 文件
当我们执行vagrant init ubuntu/xenial64初始化项目时,生成了如下Vagrantfile文件,所有关于虚拟机的配置都是基于该文件,更多配置可以查看文档:https://www.vagrantup.com/docs/vagrantfile/machine_settings
Vagrant.configure("2") do |config|
  config.vm.box = "ubuntu/xenial64"
end
默认生成的Vagrantfile文件了,包含了很多注释和说明。由于Vagrant是Ruby编写的软件,Vagrantfiles的语法其实是Ruby,但是修改Vagrantfile并不需要具备Ruby编程语言的知识。
Vagrant.configure("2")中的“2”表示配置文件版本,目前的版本为2.0。config.vm.box旨在指定box。 所有的配置包含在do/end模块之间。
Vagrantfile 变更后可以通过以下方式更新虚拟机:
vagrant reload重启vagrant destroy -f删除后vagrant up重建
创建多个虚拟机
修改Vagrantfile文件如下,创建三台虚机(master,node1,node2)
Vagrant.configure("2") do |config|
  config.vm.define "master" do |subconfig|
    subconfig.vm.box = "ubuntu/xenial64"
  end

  config.vm.define "node1" do |subconfig|
    subconfig.vm.box = "ubuntu/xenial64"
  end

  config.vm.define "node2" do |subconfig|
    subconfig.vm.box = "ubuntu/xenial64"
  end
end
仔细观察发现上面的配置文件有些冗余,稍作修改如下,通过循环的方式创建多台虚拟机。
BOX_IMAGE = "ubuntu/xenial64"
NODE_COUNT = 2

Vagrant.configure("2") do |config|
  config.vm.define "master" do |subconfig|
    subconfig.vm.box = BOX_IMAGE
  end

  (1..NODE_COUNT).each do |i|
    config.vm.define "node#{i}" do |subconfig|
      subconfig.vm.box = BOX_IMAGE
    end
  end
end
添加更多配置
Vagrantfile还可以很方便的对多台虚拟机进行个性化配置,如局域网组网,端口转发,配置CPU/内存等。更多参考:https://www.vagrantup.com/docs/multi-machine
- 配置网络
- 定义HOSTNAME
- 配置端口转发
- 修改Master节点和Node节点为不同配置
BOX_IMAGE = "ubuntu/xenial64"
NODE_COUNT = 2

Vagrant.configure("2") do |config|
  config.vm.define "master" do |masterconfig|
    masterconfig.vm.box = BOX_IMAGE
    masterconfig.vm.hostname = "master"
    masterconfig.vm.network :private_network, ip: "10.0.0.10"
	# 端口转发
	masterconfig.vm.network "forwarded_port", guest: 80, host: 8080
	# 虚拟机物理配置
    masterconfig.vm.provider "virtualbox" do |v|
		v.name = "vm-master"
		v.memory = 4096
		v.cpus = 2
  end
  end

  (1..NODE_COUNT).each do |i|
    config.vm.define "node#{i}" do |subconfig|
      subconfig.vm.box = BOX_IMAGE
      subconfig.vm.hostname = "node#{i}"
      subconfig.vm.network :private_network, ip: "10.0.0.#{i + 10}"
	  subconfig.vm.provider "virtualbox" do |v|
        v.name = "vm-node-0#{i}"
        v.memory = 2048
        v.cpus = 2
      end
    end
  end

end
Vagrant Provisioning
如果需要虚拟机再启动过程中,自动安装好相关软件,或者执行SHEL做一些初始化配置,那么就需要用到vagrant provision 相关的配置。
- 内联脚本
Vagrant.configure("2") do |config|
  config.vm.provision "shell",
    inline: "echo Hello, World"
end
$script = <<-SCRIPT
echo I am provisioning...
date > /etc/vagrant_provisioned_at
SCRIPT

Vagrant.configure("2") do |config|
  config.vm.provision "shell", inline: $script
end
- 外联脚本(推荐)
Vagrant.configure("2") do |config|
  config.vm.provision "shell", path: "script.sh"
end
当执行vagrant up命令时,会自动执行provision 内容,但后续config.vm.provision 脚本更新后,需要通过vagrant provision命令或者vagrant reload --provision才能执行变更。
Box 管理
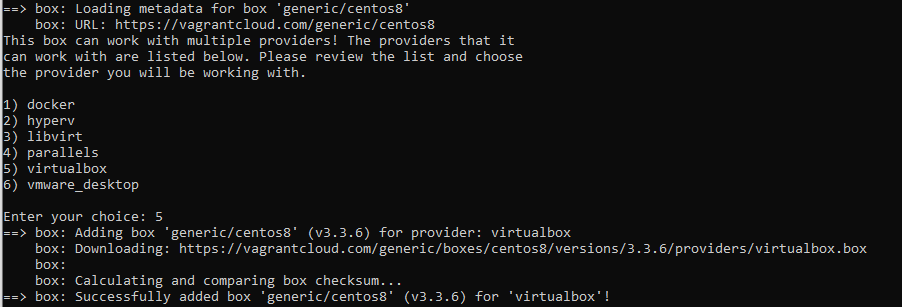
在创建运行vagrant up 命令时如果box不存在会自动下载,如果已存在就会使用本地的box,也可以使用vagrant box 命令管理维护现有的box,如下通过add命令手动添加box。Vagrant box 官方仓库地址:https://app.vagrantup.com/boxes/search。
vagrant box add generic/centos8
添加后路径: C:\Users\当前用户\.vagrant.d\boxes\generic-VAGRANTSLASH-centos8
- 查看本地已有的box
>vagrant box list
generic/centos7 (virtualbox, 3.4.2)
generic/centos8 (virtualbox, 3.3.6)
ubuntu/xenial64 (virtualbox, 20210804.0.0)
Vagrant实例,一键拉起Docker实验环境
下面通过一个实例来展示下Vagrant的魅力,配置一台虚拟机并安装配置好docker环境用于docker学习。
- 创建一台名为
DockerVM的双核4G的VM,操作系统为CentOS7。 - 为该VM安装配置好Docker。
Vagrantfile配置
# All Vagrant configuration is done below. The "2" in Vagrant.configure

Vagrant.configure("2") do |config|

  config.vm.define "DockerVM" do |docker|
    docker.vm.box_download_insecure = true
    docker.vm.box = "generic/centos7"
    docker.vm.hostname = "DockerVM"
    docker.vm.provider "virtualbox" do |v|
      v.name = "DockerVM"
      v.memory = 4096
      v.cpus = 2
    end
    docker.vm.provision "shell", path: "install.sh"
  end

end
install.sh初始化脚本
# YUM update
sudo yum install -y yum-utils iproute-tc

# Add Docker repo
sudo yum-config-manager \

    --add-repo \

    https://download.docker.com/linux/centos/docker-ce.repo

# Use Tsinghua Mirror
sudo sed -i 's+download.docker.com+mirrors.tuna.tsinghua.edu.cn/docker-ce+' /etc/yum.repos.d/docker-ce.repo

# Install Docker
sudo yum -y install docker
sudo systemctl enable docker
sudo systemctl start  docker
sudo systemctl status docker

# Run hello-world
sudo docker run hello-world
目录结构
$ ls
install.sh  README.MD  Vagrantfile
以上只需要vagrant up 命令就可以拉起一台配置好docker环境的虚拟机了,非常方便。
其实Vagrant组建多台虚拟机环境时,非常方便,比如通过多台虚拟机搭建K8S集群时,Vagrant只需几个简单的配置文件就可以拉起一套K8S集群学习环境了。
参考资料:
本站文章如无特殊说明,均为原创,转载请注明出处,基于 CC BY-SA 4.0 协议授权